Tutor LMS Plugin Review: Build & Sell Courses Like a Pro

Building and managing an online platform can be difficult for beginners. Tutor LMS makes this easier by offering a complete learning management system inside WordPress. Thanks to its comprehensive feature set and user-friendly interface, it assists instructors, course providers, and educational institutions in creating e-learning sites without writing a single line of code. The plugin succeeds because it tackles major issues such as course design, consolidating student administration, and revenue generation under one roof.
This review article covers the features, dashboard, and reasons why this plugin is an excellent option for anyone looking to use WordPress to build an online learning platform.
Plugin Compatibility & Performance Benchmarks
- Plugin Name: Tutor LMS
- Category: Learning Management System (LMS)
- Compatibility: To ensure the best performance and compatibility, use WordPress version 5.8 or above along with PHP version 7.4 or later, MariaDB 10.1 or higher, and MySQL version 5.7 or above
- Pricing: Tutor LMS is available in both free and premium versions. For individual sites, the lifetime package starts at $499, while the premium plan starts at $199 annually. You can compare the features of the free and pro versions offered here.
- Active installations: 100,000+
- Ratings & Reviews: Users consistently rate Tutor LMS 4.5 out of 5 for performance and reliability.
Course Building Using Tutor LMS
Tutor LMS Course Builder is a centralized platform for designing and managing interactive online courses. The addition of structured subjects and courses in a logical order enables you to arrange your curriculum. A variety of content types, like text, pictures, videos, and downloadable files, can be used to enrich each lesson. With the help of the builder, you can also generate assessments like quizzes and assignments with various question formats, adjust parameters, and offer personalized feedback, all from a user-friendly interface.
Accessing the Course Builder in Tutor LMS
Using the course builder in Tutor LMS is simple and flexible, with features accessible from both the Tutor LMS front-end dashboard and the WordPress backend.
From the WordPress Dashboard, navigate to Tutor LMS > Courses, then click “Add New” to create a new course or “Edit” an existing one to launch the Course Builder.
As another option, use the Tutor LMS frontend dashboard to create a new course, or open the builder by hovering over an existing course on the editing page.
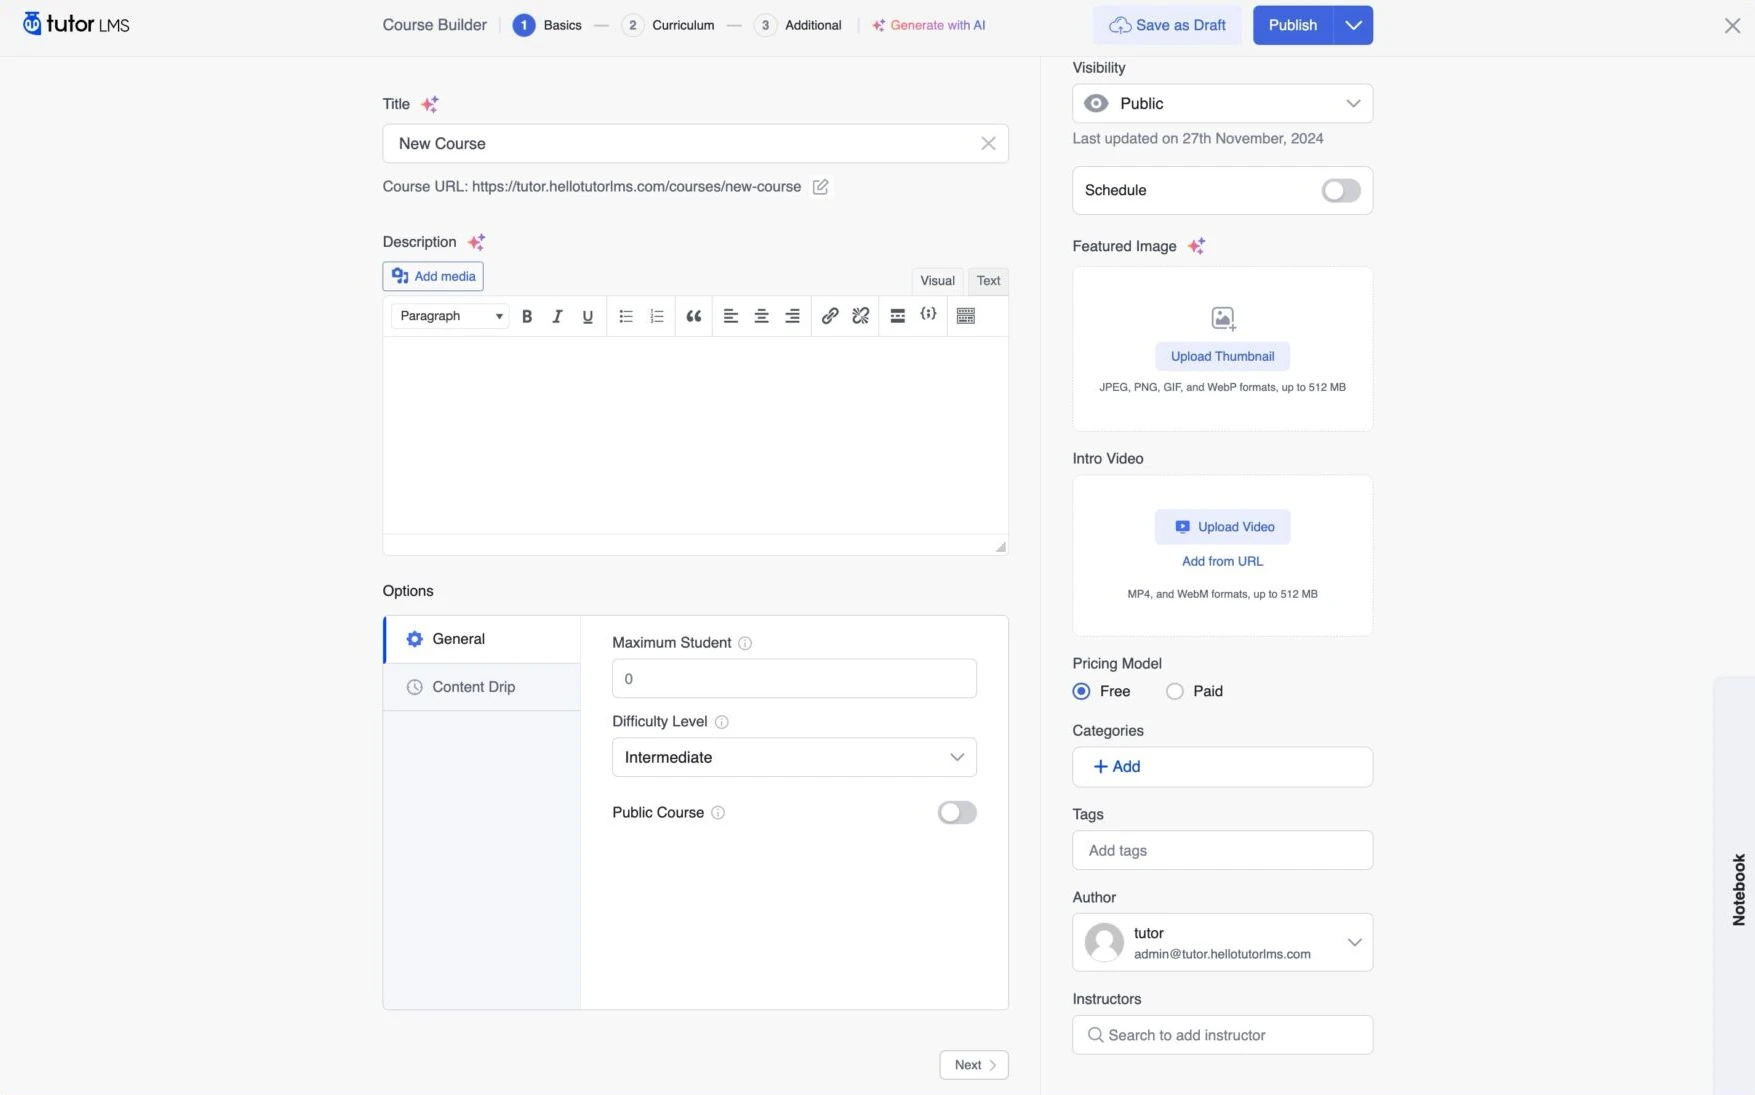
Course Basic section
The Course Basic section in Tutor LMS lets you set the core details of your course. Here, you define key elements that affect how the course appears and works, like the title, description, category, and featured image, making sure your course is accessible and easy for students to explore.
1. Course Title
The Course Title is the name displayed for your course and should clearly and concisely reflect its content. The Course URL is the web address where the course can be accessed; it’s auto-generated from the title but can be manually edited for clarity or SEO purposes.
2. Course Description
The Course Description offers a brief overview of your course content and learning goals, aiming to attract potential students. Tutor LMS includes a rich text editor that lets you format the description with headings, bullet points, and visuals. You can also add links and emphasize key points using bold, italics, or underlining for a more engaging and informative presentation.
3. Course Settings
The course settings section lets you customize important aspects of your course to match your teaching objectives and learner preferences and provides complete control over how your course is displayed and accessed, thanks to its choices for managing course visibility, enrollment procedures, length, difficulty level, and more.
4. General Settings
In the general settings section, you can specify the maximum number of students who can enroll; entering “0” means unlimited access. To help out students, you can additionally define the course’s difficulty level (all levels, beginner, intermediate, or expert). Additionally, enabling the public course makes the course content publicly accessible without any user registration.
5. Content Drip
The Content Drip feature in Tutor LMS enables the gradual release of course materials, supporting steady student progress. Content can be published in chronological order, scheduled by dates, or set to unlock only after passing required classes or quizzes, or after a specified number of days after membership.
6. Course Visibility
The course visibility option in Tutor LMS allows you to manage who can access your course materials, which helps you in providing both public and private training. Courses can be marked as private—accessible only to enrolled students and admins with a password—or set as public, making them open and searchable to all.
7. Schedule
The Schedule feature lets you set a future date and time to launch your course. To enable it, just select your desired release date and time, turn on the “Schedule” option, and then click “Ok” to confirm.
8. Featured Image
The featured image acts as the visual representation of your course and can be seen on social media, course catalogs, and listings. To set a featured image, click “Upload Thumbnail,” choose an image from your media library or upload a new one, and click “Select.”
9. Intro Video
The Intro Video section lets you add a video introduction to your course, giving potential students a preview of your teaching style and content. To upload a video, click “Upload Video,” choose an MP4 or WebM file from your computer, or use “Add from URL” to link a video hosted online, such as on YouTube or Vimeo.
10. Pricing Model
The Pricing Model section allows you to define the pricing structure for your course and provides options such as offering the course for free, charging a fee, regular pricing, and offering a price. This flexibility allows you to manage various pricing structures and attract various groups of students.
11. Categories
Tutor LMS allows you to classify your courses using categories, making it easier for students to quickly find what they are looking for. To create a new category, click the “+ Add” button, enter a name, and select a parent category to organize your content hierarchically. After saving, you can assign it to your course by selecting it from the list. To help students find the course easily, a course can be categorized into multiple categories.
12. Tags
Tags let you label your courses with specific keywords that reflect the course content, making it easier for students to find them through search and filtering. To enable these features, start typing in the “Tags” area. As you type, existing tag suggestions will appear. Then you can type a new tag and use the “+Add” option when it appears, or pick one from the list. This is the most suitable method to improve the organization and visibility of your course.
13. Author
The Author section lets you assign an instructor to the course, usually the person who created the content, and will handle student engagement. To assign an author to your course, open the dropdown menu in the Author section and choose the correct instructor from the list of registered users on your Tutor LMS platform.
14. Multiple Instructors
The Instructors section lets you add multiple instructors to a course, enabling collaborative teaching. Simply begin typing an instructor’s name or email in the search bar, then choose from the list of registered users to assign them.
15. Notebook
The Notebook feature in Tutor LMS serves as a convenient workspace where you can note down ideas, draft lessons, or save code snippets as you develop your course. Accessible via the “Notebook” bar in the bottom-right corner, it can be minimized for a cleaner view or expanded to full screen for easier editing. After finalizing the Course Basics section, simply click “Next” to move on to the Curriculum section and begin organizing your course materials.
Curriculum
The Curriculum section in Tutor LMS is your course-building hub, designed to help you create a well-structured and engaging learning experience. It offers a clear, visual representation of your course layout, making it easy to add and manage components. You can structure your content into Topics—similar to chapters or modules—each containing Lessons, Quizzes, and, if enabled, Assignments. Lessons can include text, video, audio, and downloadable resources. With intuitive drag-and-drop functionality, this section allows you to efficiently structure your course in a way that promotes clear learning progression for students.
Adding and Managing Topics
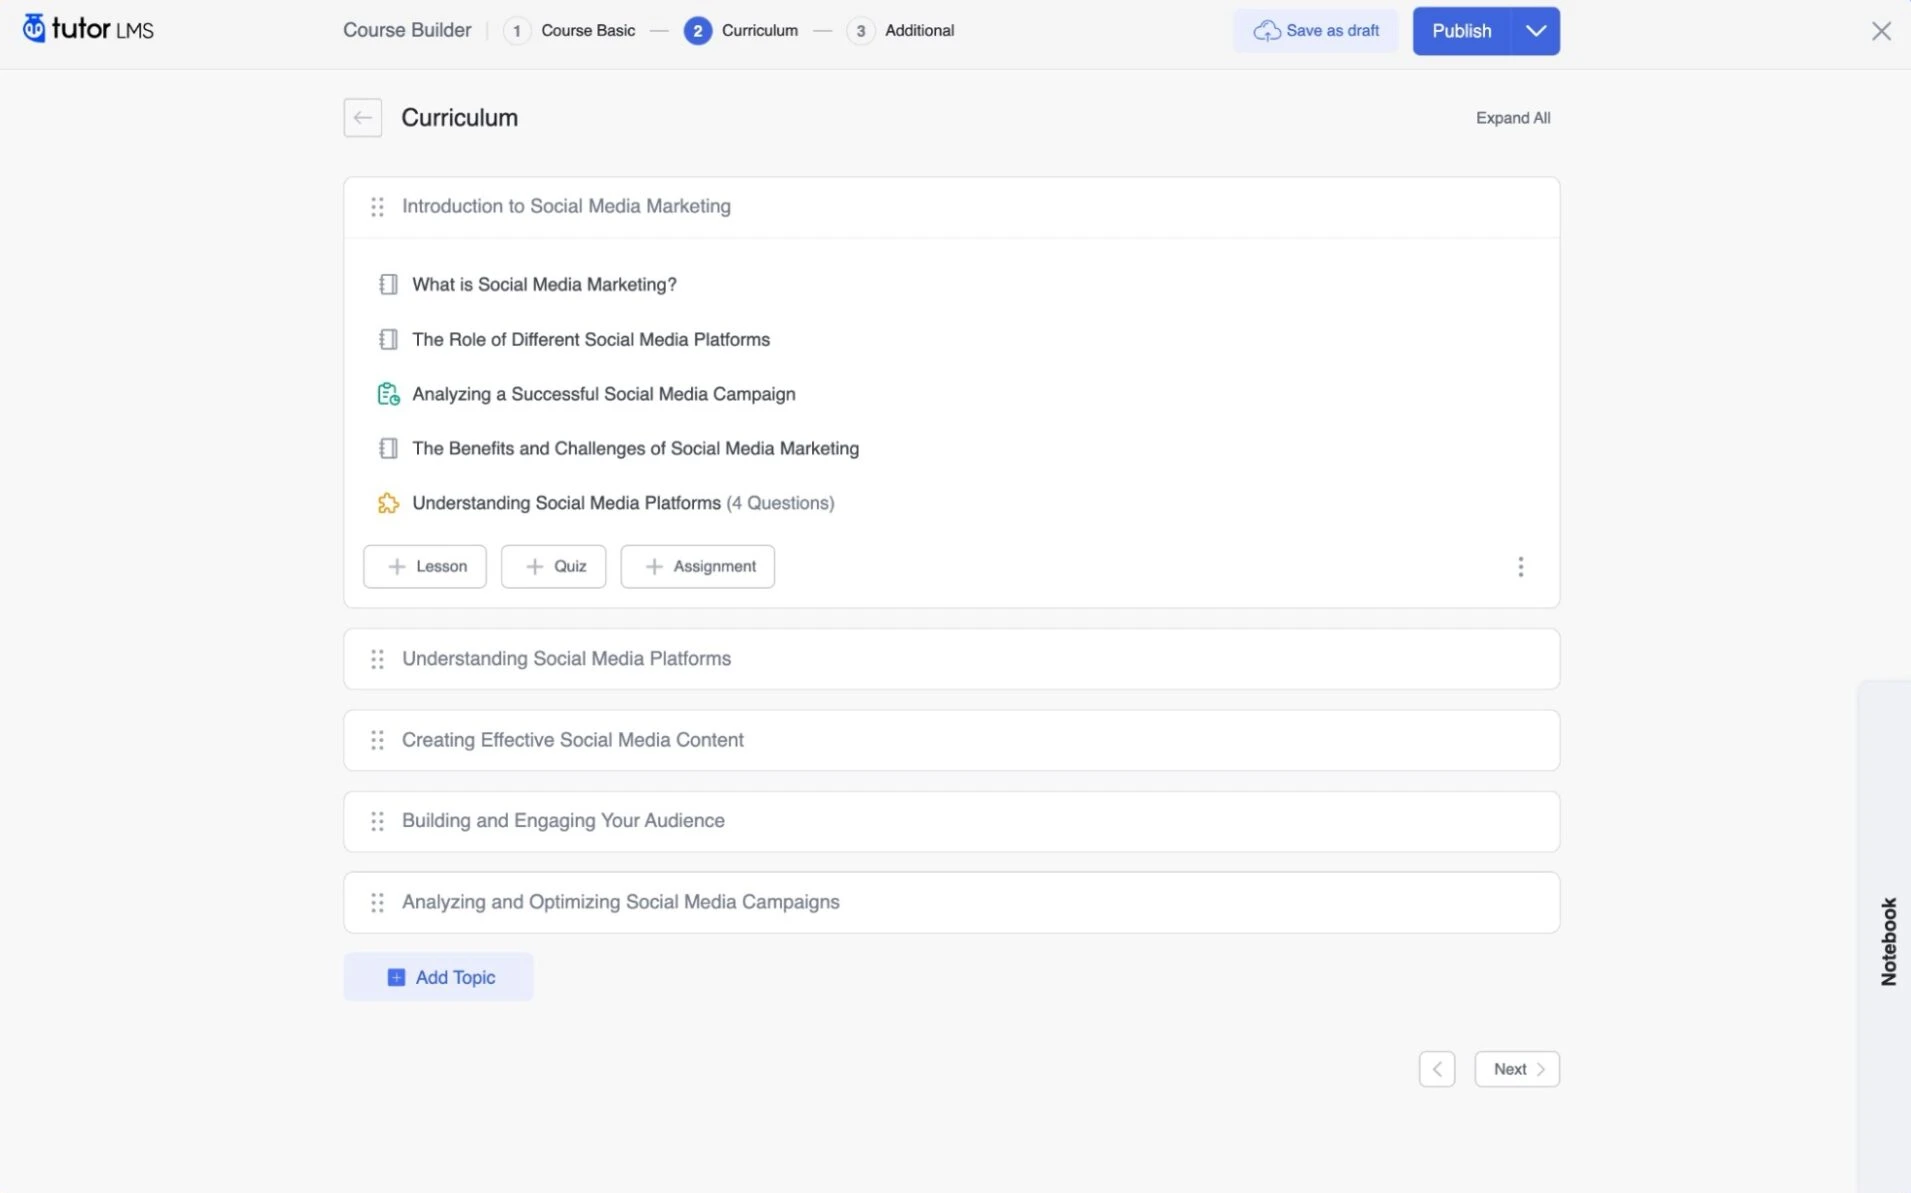
Adding and managing Topics in Tutor LMS helps you organize your course content into clear, structured segments, much like chapters in a textbook. Each topic serves as a container for related lessons, quizzes, and assignments, giving your course a logical flow and making it easier for students to follow. This structured layout enhances the learning experience by grouping content based on themes or modules.
Adding a New Topic
To create a new topic in the Curriculum section of Tutor LMS, just click the “+ Add Topic” button at the bottom. Enter a meaningful and descriptive title that clearly reflects the subject matter of the topic. If needed, you can also add a brief summary to offer context or an overview. Once you’ve filled in the necessary details, click “Ok” to save and integrate the new topic into your course layout.
Reordering Topics
Reordering Topics is quick and intuitive with Tutor LMS. Just click and hold the topic title, then drag and drop it to your preferred position within the Curriculum section to adjust the course flow as needed.
Adding and Managing Lessons
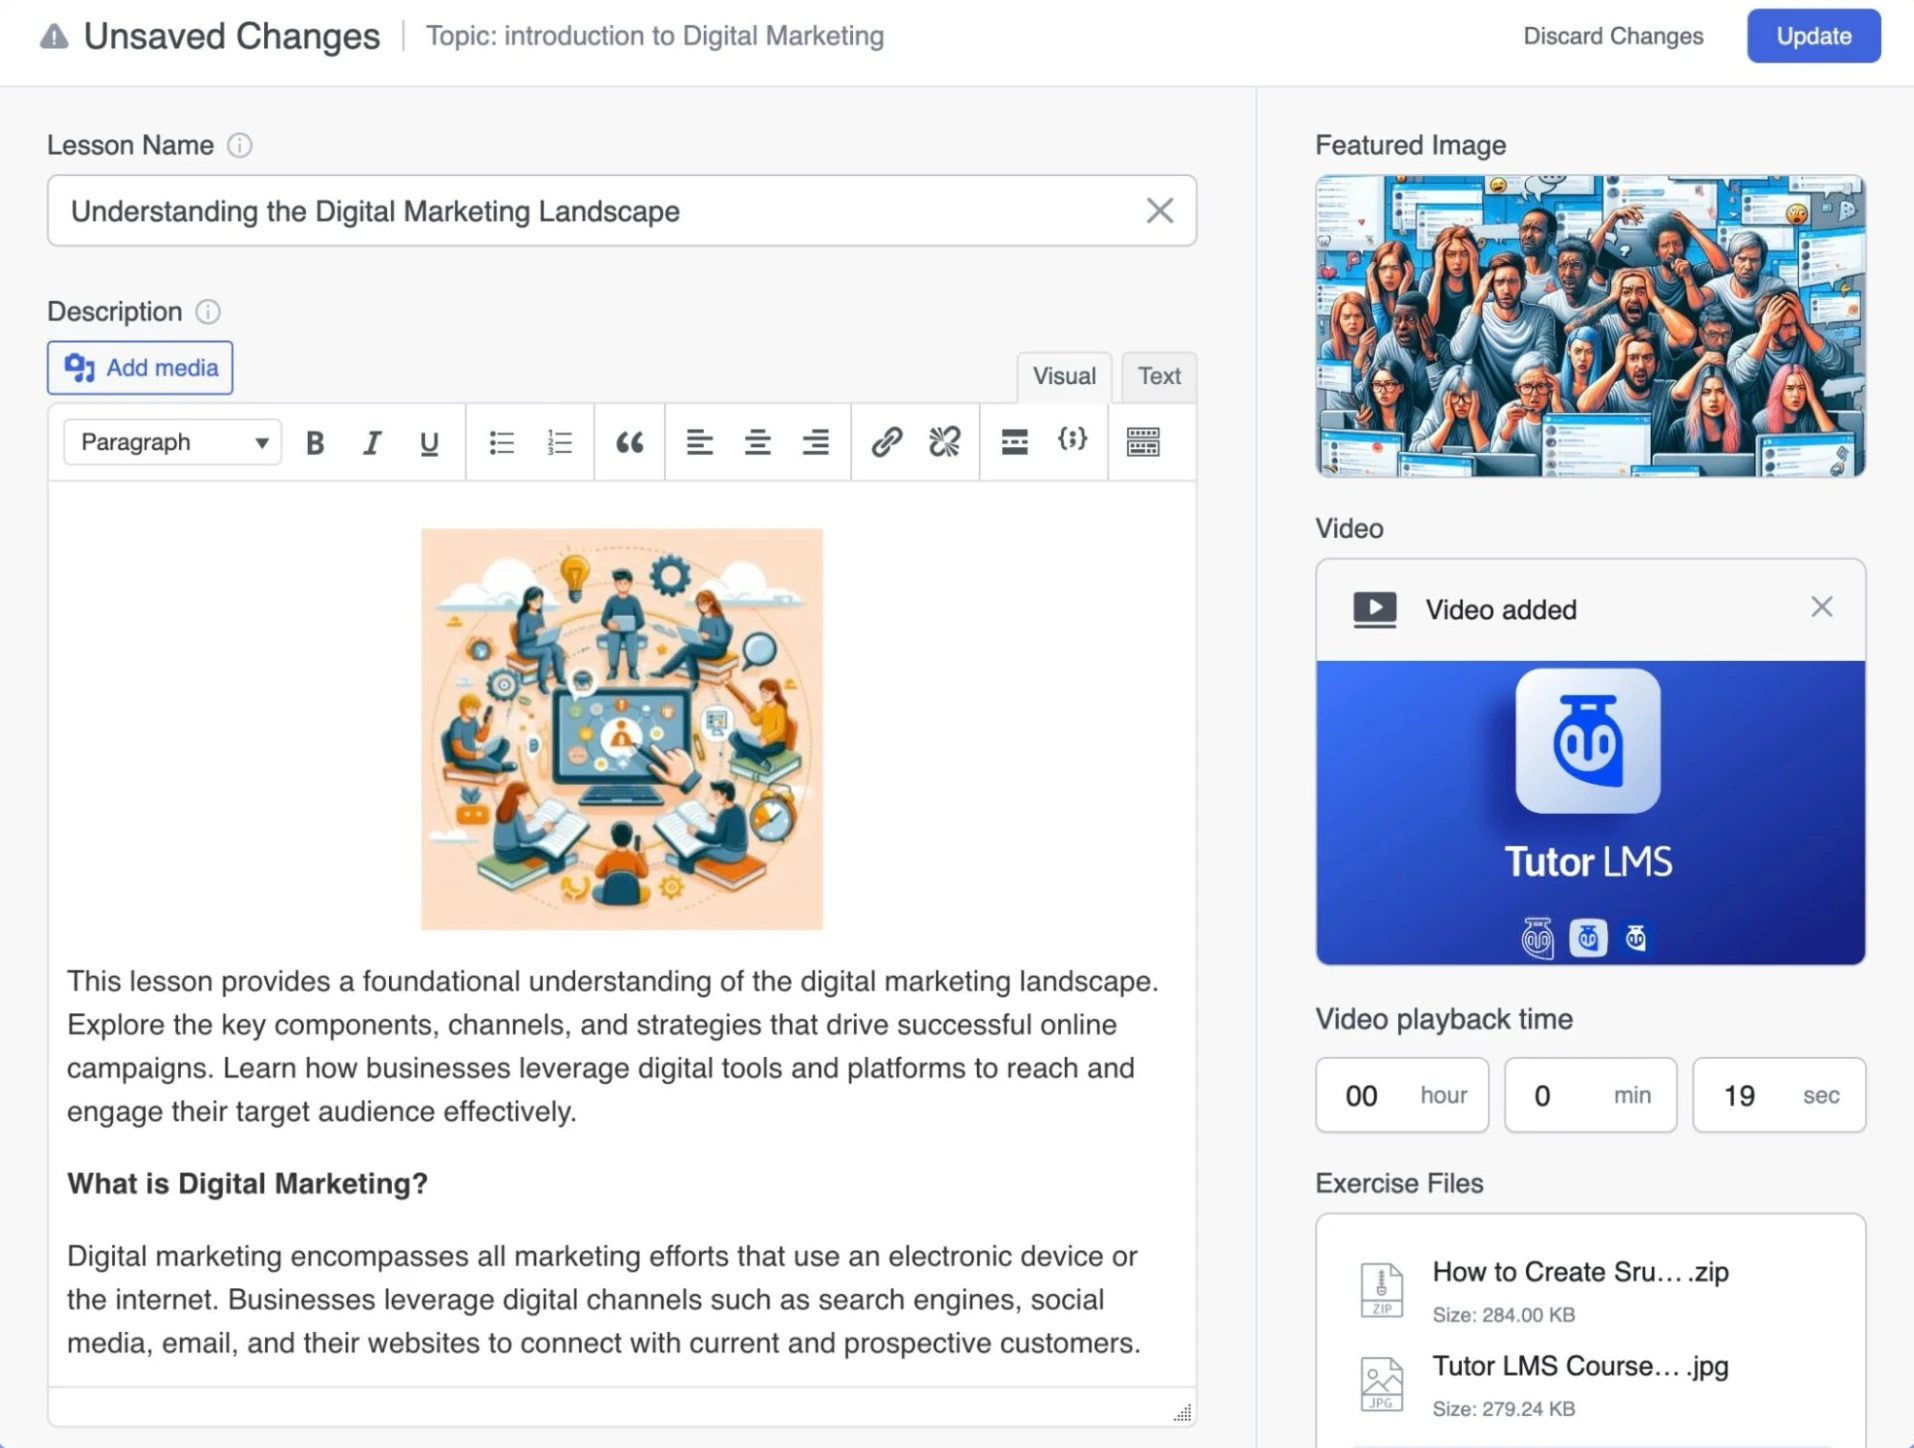
Lessons are the essential building blocks of your course in Tutor LMS, serving as the main platform for sharing educational content. To create a new lesson, click the “+ Lesson” button in any topic section. A pop-up will appear for you to provide a clear, descriptive title. In the “Content” area, you can input your main teaching material using Tutor LMS’s rich text editor. This editor supports a variety of content types, including formatted text, images, and multimedia, allowing you to craft lessons that accommodate diverse learning preferences and keep students engaged.
Featured Image
The Featured Image serves as the visual identity of your course, appearing prominently on the course catalog and overview pages. Choose an image that clearly reflects your course content and appeals to your target audience, as it plays a key role in grabbing attention and encouraging enrollment.
Video
The “Video” section in Tutor LMS enables you to enrich your lessons with visual content, helping to create a more dynamic learning experience. You have the option to upload an MP4 file from your device with a custom thumbnail or embed videos from YouTube and Vimeo by pasting the video URL. Additionally, you can insert embed codes or short codes for even more flexibility, making it easy to incorporate video content that supports and enhances your lesson material.
Video Playback Time
The “Video Playback Time” field lets you manually specify the duration of your video after it has been uploaded to the lesson. This feature gives students a clear indication of the video’s length, helping them manage their time more effectively as they progress through the course.
Exercise Files
The “Exercise Files” section in Tutor LMS enables you to provide additional resources to students, supporting file types such as PDFs, documents, audio, video, and more. These materials help to reinforce the course content and offer students practical tools for hands-on learning, making the course more comprehensive and interactive.
Lesson Preview
The Lesson Preview feature lets you provide potential students with a sneak peek of your course content before they commit to enrolling. Activating the “Lesson Preview” option lets potential learners preview a sample of your course content. This feature gives them a sneak peek into your teaching style and provides a glimpse of the valuable knowledge they can gain by enrolling in the course.
Saving your Lesson
Once you’ve finished creating your lesson, click the “Save” button located at the top right corner of the Course Builder to save all your changes. If you wish to discard any changes, simply click the “Cancel” button next to “Save”. After saving, you can continue adding more lessons, quizzes, and other content to enhance your course. To save, just click “Update”.
Assignments
Assignments give students the opportunity to apply their knowledge and demonstrate their understanding through practical activities.To create a new assignment for your course, click the “+ Assignment” button inside a topic, which is positioned beside the “+ Lesson” and “+ Quiz” buttons in the Curriculum section. This will open the Assignment popup window, where you can define the assignment’s details and settings.
Assignment Title
The Assignment Title field allows you to give your assignment a clear and concise name, ensuring that it accurately reflects the task or topic of the assignment. The Summary field provides an opportunity to offer detailed instructions and context for the assignment. This is where you can clearly communicate the objectives, expectations, and any relevant information that students need to complete the assignment successfully. Using the Rich Text Editor, you can structure your instructions by adding headings, subheadings, bullet points, numbered lists, and formatting options like bold and italics, making the instructions engaging and easy to follow.
Adding Media
You can enhance your assignment summary by adding various media types. Simply click the “Add Media” button to upload or embed images, audio files, and videos. This allows you to provide additional clarification, illustrate key concepts, or make the assignment more engaging and interactive for your students.
Assignment Attachments
The “Attachments” section allows you to provide supplementary files to enhance your students’ understanding and completion of the assignment. To upload a file, simply click the “Upload Attachment” button, pick the file from your computer, and it will be added to the “Attachments” section.
Assignment Settings
The “Assignment Settings” in the Tutor LMS Course Builder offer various customization options to manage assignments effectively. These settings allow you to set a time limit for completing the assignment, with options in weeks, days, or hours, ensuring tasks are completed within a specified timeframe. The “Total points” field enables you to assign a point value to the assignment, contributing to the course’s grading structure. You can also set a “Minimum pass points” requirement, ensuring students must achieve this score to pass the assignment. The “File Upload Limit” field restricts the number of files students can submit, while the “Maximum File Size Limit” field helps prevent students from uploading excessively large files by setting a limit in MB (megabytes).
Frontend Dashboard Overview (All Users)
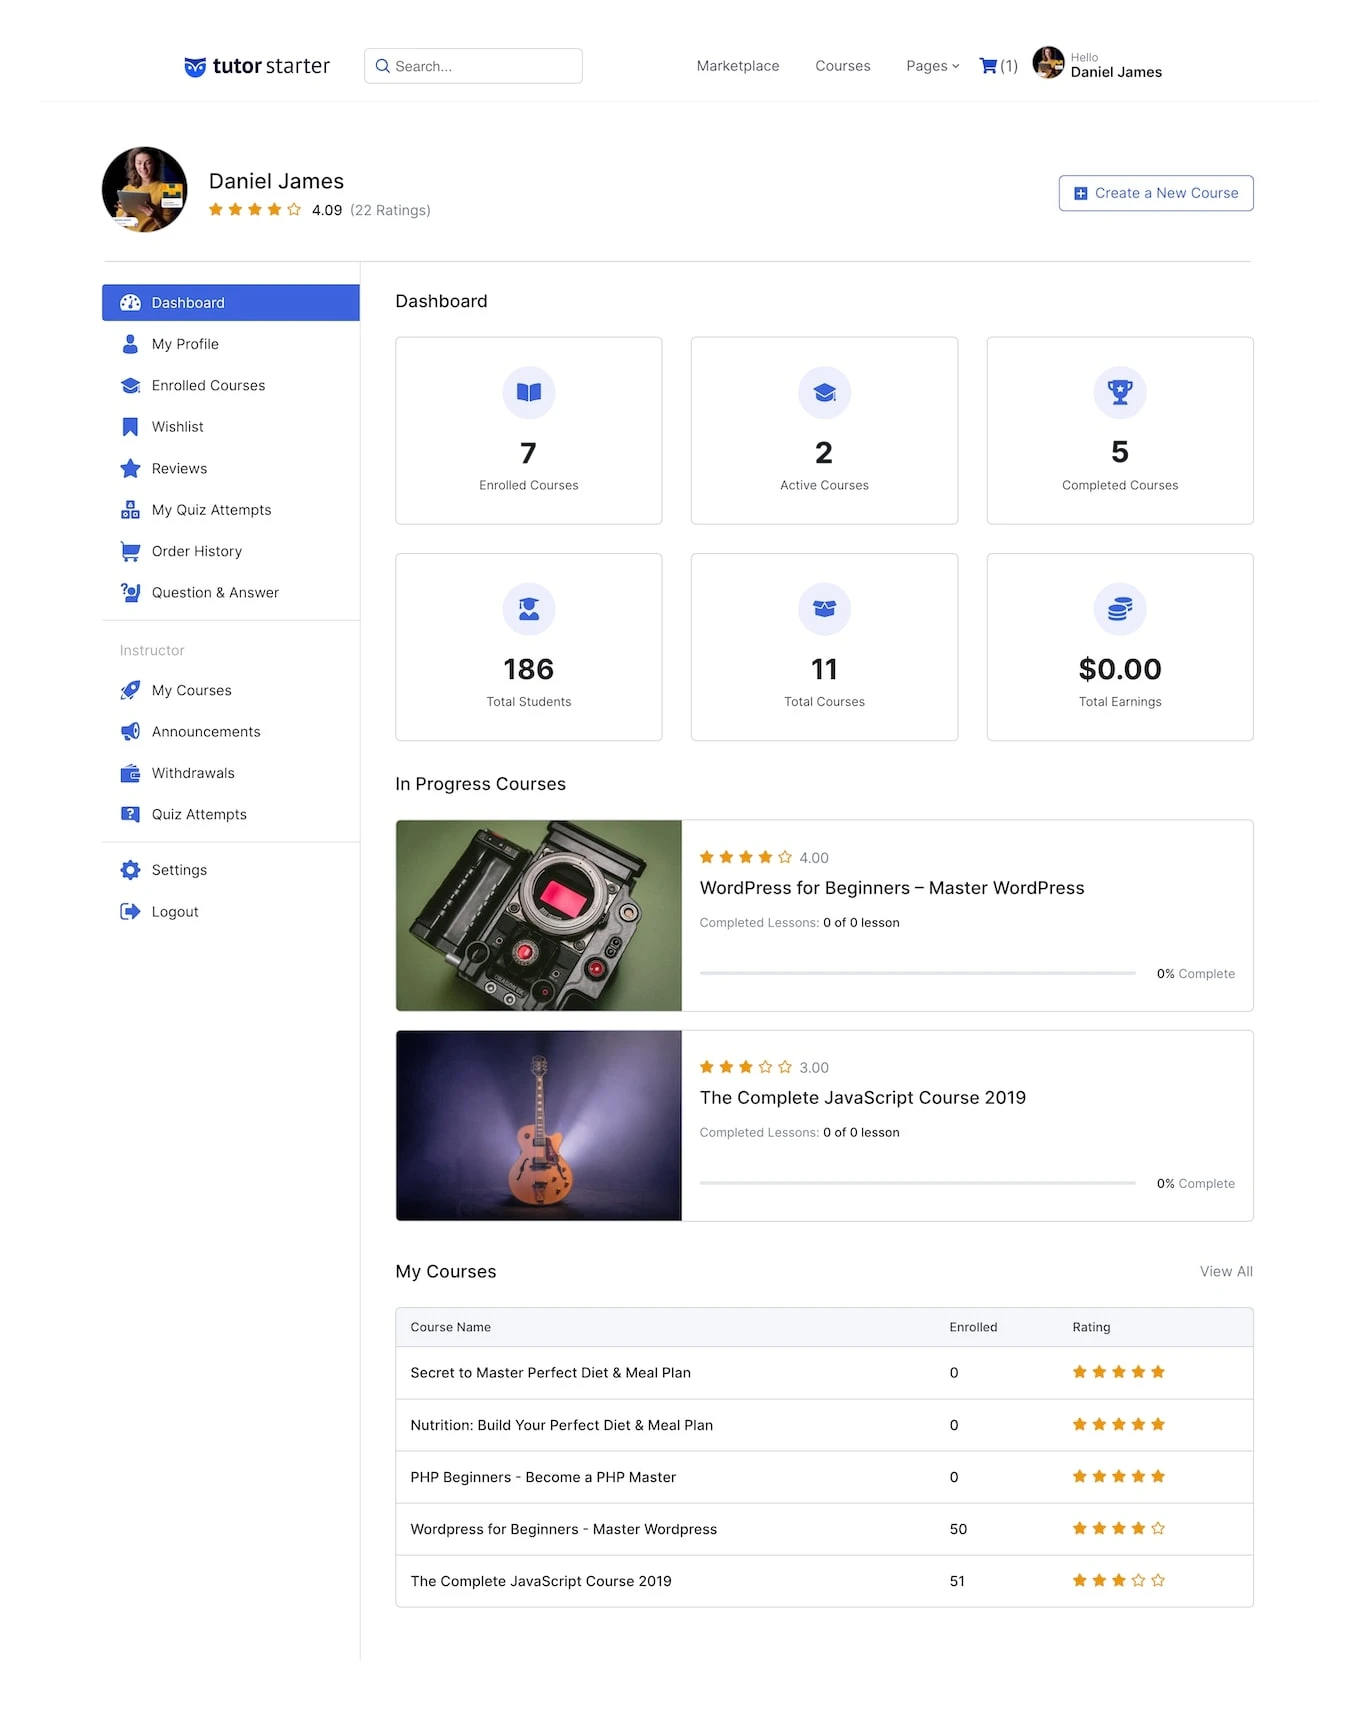
The frontend dashboard overview for all users provides you with basic stats, along with the following sections included in it:
1. My Profile
In my profile dashboard, you can see your data, such as your name, username, email address, phone number, profession or skills, and a brief biography.
2. Enrolled Courses
Enrolled courses provide you with a comprehensive summary of all your enrolled, ongoing, and completed courses. In addition, you can view your progress and the number of courses you’ve completed.
3. Wishlist
This section will showcase all the courses you’ve added to your wishlist, allowing you to easily access and keep track of courses you’re interested in for future reference. When you’re ready, click the “Add to Cart” button to purchase the courses.
Tutor LMS provides the following two methods for adding a course to a wishlist:
- From the course archive page: Navigate to the course you’re interested in and click the bookmark icon in the upper right corner of the course box.
- Through the course details page: Go to the course details page of the course you’re looking for and then click the wishlist button on the top right.
4. Reviews
This section showcases the reviews you have written and the ones you have received. You can modify and remove the reviews you submitted through the “Given” tab. Administrators are provided with an option to manage and delete reviews through the backend access if needed.
5. My Quiz Attempts
The “My Quiz Attempts” section is dedicated to showcasing all your quiz attempts and their results.
When you click the Details button, you will be taken to a page that includes all of the information regarding that quiz attempt, such as the questions, answers, and other important details.
If you want to delete an attempt, simply click the trash icon located next to the Details button.
After that, a confirmation pop-up will show up. You can either click “Yes, I’m sure to confirm and delete the attempt, or you can choose “Cancel” to stop the action.
6. Order History
The Order History section contains important information, such as the purchase date, price, and order status, about the courses you purchased.
To make searching easier, you can use the date picker situated in the upper right corner of the page to filter your orders by choosing particular dates.
7. Question and Answer
In Instructor Mode, you can see the questions that your students have submitted, answer them, and mark them as important or solved. Additionally, you can use the action menu to archive, designate as unread, or remove questions.
In Student Mode, you can view the questions you’ve asked, the course name, and the number of responses. You can either respond to them, mark them as unread, or delete them using the action menu.
8. Calendar
The calendar view gives you a quick overview of all your monthly assignments. The related assignments will be provided beneath the calendar; simply select the desired month and year from the dropdown menu on the top left.
Frontend Dashboard Overview(Instructor/Admin)
So far, all the Frontend Dashboards we covered apply to all users. Now, let’s explore the dashboards available exclusively to Instructors and Admins in Tutor LMS Pro.
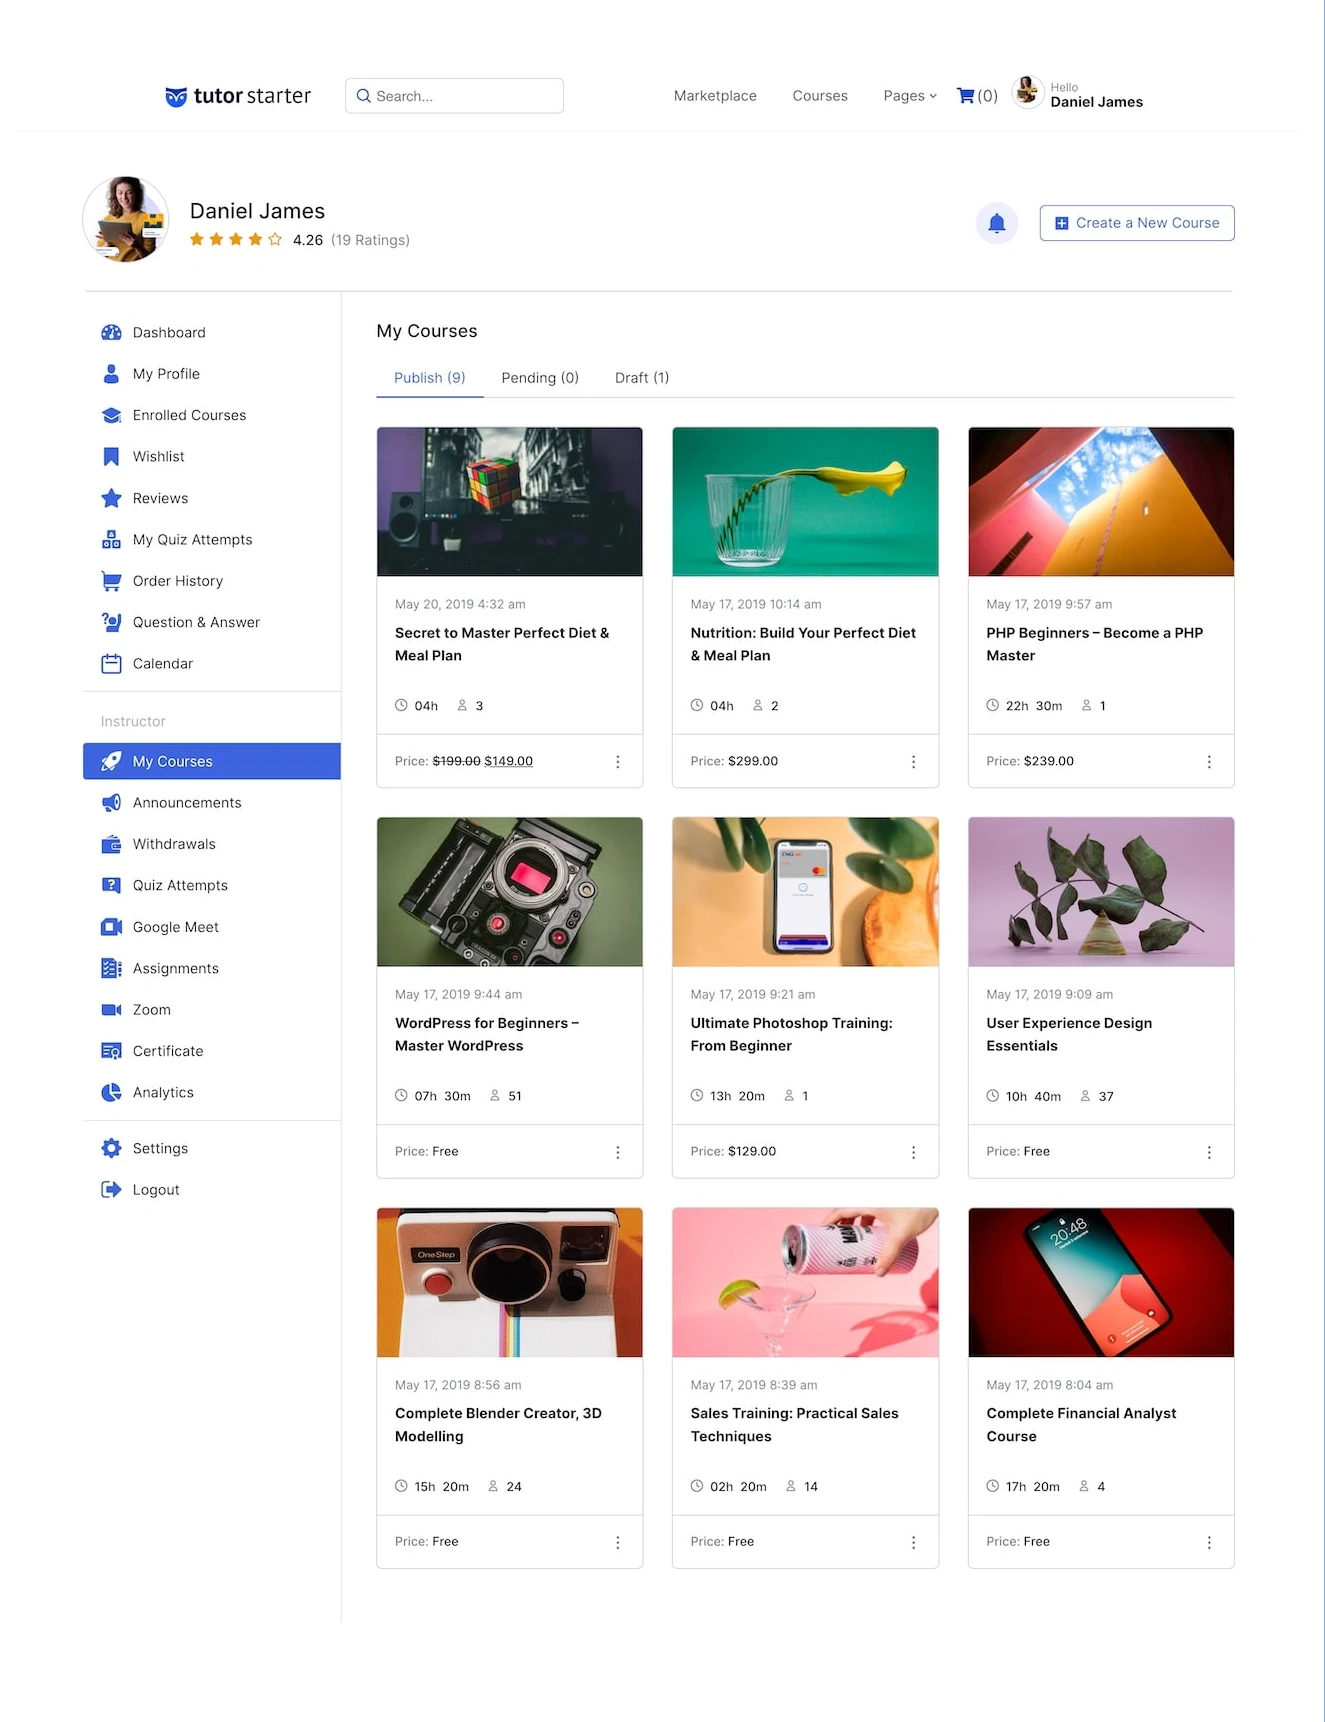
1. My Courses
The My Courses dashboard showcases important information like course duration, enrollment count, and pricing according to their current status.
2. Announcements
The Announcements section allows you to create updates for any of your courses. To create a new announcement, click “Add New Announcement,” choose the course from the pop-up menu, add a title, and enter the details in the summary field. The new announcement will show up as soon as it is published.
3. Withdrawals
The Withdrawals section provides you with an overview of the current balance and an option to initiate a withdrawal if your balance surpasses the designated minimum withdrawal amount. Additionally, you can also monitor the progress of your withdrawal requests, including those that are pending, completed, or rejected.
4. Quiz Attempts
The section provides a full list of all your students’ quiz attempts, and the list can be arranged either in ascending or descending order and filtered by date and course.
If necessary, you can manually go through each question in the Quiz Feedback Mode by clicking the details icon next to each entry.
Below this, you’ll find the Instructor Feedback field, allowing you to provide personalized guidance or suggestions.
5. Google Meet
The Google Meet dashboard allows you to set up and access all of your Google Meetings and associated settings.
6. Assignments
The Assignments dashboard displays a complete list of all assignments you’ve created across your courses. You can filter this list by course and date, and sort it in ascending or descending order.
Clicking the Details button next to an assignment will show you its full details, along with a list of student submissions. From here, you can evaluate each submission and provide your feedback.
7. Zoom
The Zoom Dashboard provides an option to access all of your Zoom Meetings and other features, along with the active meetings and expired meetings listed in the first and second tabs, respectively.
To locate a particular meeting, you can either search or filter them by date and course. Additionally, by selecting the start meeting button, you can begin your meeting.
8. Certificate
To create a new certificate, simply click the “Create Certificate” button, which will open the Certificate Builder.
Once published, your certificate will appear under the All Certificates section. From there, you can edit, unpublish, or delete any certificate as needed.
9. Analytics
The Analytics dashboard provides a comprehensive breakdown of your eLearning site’s performance, helping you track growth and engagement through various dedicated reports. The Overview section gives you quick stats, an Earnings Graph, a list of the Most Popular Courses, and Recent Reviews. In the Courses tab, you’ll find detailed information about each course, including total learners and earnings. The Earnings section offers a complete view of your financial performance, showing Total Earnings, Sales, Withdrawals, Current Balance, and a visual earnings chart. Meanwhile, the Statements tab lists all course purchase records, along with associated earnings, commissions, and fees.
You can also explore the Students section, where you’ll see a complete list of all learners and relevant details about their activity. For added convenience, the Export tab lets you quickly download reports related to your sales and student data with a single click, making data tracking and analysis both efficient and user-friendly.
10. Settings
This section allows you to manage key account settings, including updating your profile information, changing your password, configuring withdrawal preferences, and linking or modifying your social profile details.
The Profile tab lets you set up and update your personal information, including your first name, last name, phone number, skill or occupation, bio, and display name. You can also upload your profile image, banner, and certificate signature directly from this section.
11. Password tab
Next, the Password tab allows you to securely update your account password whenever needed, ensuring your profile remains protected.
12. Withdraw
The Withdraw tab lets you configure your withdrawal preferences. You can select your desired payout method from the available choices and input the necessary account details for future transactions.
13. Social Profile
The Social Profile tab gives you the option to add links to your external profiles, including platforms like Facebook, Twitter, LinkedIn, GitHub, and your personal website. This helps create a more connected and visible professional identity across the web.
Pricing
Tutor LMS provides two simple licensing options to accommodate a variety of eLearning needs. You can choose an Annual Plan starting at $199/year, perfect for keeping your courses up-to-date with the latest features and support. If you prefer a one-time investment, the Lifetime Access option at $499 grants you unlimited updates and priority support forever.
For a detailed breakdown of features and to choose the plan that best fits your needs, visit the official Tutor LMS pricing page.
Noteworthy Features to Remember
- Interactive Quiz Creation: Tutor LMS Effortlessly create dynamic quizzes with multimedia, various question types, randomization, and advanced assessment features using a simple drag-and-drop interface.
- Integrated eCommerce System: With integrated payment gateway support and a seamless buying experience, you can market your courses with ease.
- Flexible Subscription Plans: Provide course packages, full-site memberships, or monthly subscription structures through a simple revenue management system.
- Course Packages: Provides added value by combining many courses and offering them as bundled packages.
- AI-Powered Course Creation: Automatically generate full courses, including topics, lessons, quizzes, and images, with a single click powered by AI.
Pros and Cons
Pros
- Easy-to-Use Interface
- Even without upgrading, the free version offers impressive functionality.
- Supports online course markets as well as independent educators.
- Simple integration with common WordPress tools.
Cons
- Please note that some advanced features are only available with the premium plans.
- Modifications are needed on the UI and style to match the themes.
Performance & Optimization Insights
Even though Tutor LMS was designed with performance in mind, its speed is dependent on your hosting and setup, just like any other plugin. To preserve the core functionality of your site:
- Use caching plugins and a CDN
- Compress images and videos used in lessons
- Keep your plugin and WordPress core updated to the latest versions.
- Avoid installing too many unnecessary add-ons
Recommended Use Cases
- Freelance educators and coaches offering niche courses
- Schools and colleges running remote learning programs
- Businesses hosting internal employee training
- Agencies building LMS solutions for clients
- Startups creating eLearning marketplaces
Key Takeaway & Recommendation
If you are on a journey to start an online course or create an e-learning website using WordPress, Tutor LMS is a strong contender to get started with and can expand according to your needs. Tutor LMS has the resources to support your objectives, whether you are training a company or a lone instructor. If you are prepared to grow, the premium version offers even more benefits.
Download & Explore
Explore how Tutor LMS can streamline your course creation and elevate your eLearning site—visit the official plugin page to learn more.
Leave a Reply
Articles
Related Insights.
Blogs and Resources on WordPress, WooCommerce, SEO and Marketing

Leave a
Comment.