The Ultimate Step-by-Step Guide to WordPress Speed Optimization in 2026
Slow WordPress sites are rarely a mystery, they are a sequencing problem. Clients come to us after trying everything: installing a caching plugin, swapping themes, following guides. The site is still slow.
What makes this genuinely difficult is that the bottleneck is rarely the same twice. A fix that shaved two seconds off one site might do almost nothing for the next. That is why we always begin with the Measurement and Audit Phase before touching any settings. Assumptions are expensive.
This guide covers the actual causes we find repeatedly, and how to fix them in the right order. Sequence matters more than most people realise. If you’d rather have experts handle it for you, check out our WordPress Speed Optimization Service.
Why Sequence Is Everything
Most WordPress speed guides hand you a list of fixes. This one gives you an order. That distinction matters more than any individual tip in it.
The reason is dependency. Each phase in this guide builds on the one before it. Caching amplifies a fast foundation, it does not create one. If your server is already struggling under its own load, adding a caching layer reduces the symptoms without touching the cause. The site feels slightly less slow on cached pages and identical everywhere else. You have spent time and effort moving sideways.
The same logic runs through every phase. Cleaning up plugin asset loading on a server with a 900ms TTFB will not get you under 3 seconds. Optimising images on a site still running 60 plugins that load scripts everywhere will recover some weight but leave the larger drag in place. Fixing Core Web Vitals at the end, before the infrastructure and code layers are sorted, means you are patching metrics on a site whose underlying problems are still accumulating.
Working out of sequence is not just inefficient, but often misleading. A caching plugin installed early can mask how slow the origin server actually is. That hidden bottleneck resurfaces the moment a logged-in user bypasses the cache, or traffic spikes past what the cache can serve. You think the site is fixed. It is not.
The phases here are ordered so that each fix operates on a cleaner, faster baseline than the one before it. That is what makes the gains stack rather than cancel each other out.
Phase 1: Measurement and Audit
You cannot fix what you cannot see. This phase establishes your baseline and surfaces the real bottleneck before anything else is touched.
Step 1: Measure First, Change Nothing
Every optimization project starts with a baseline measurement. Do not touch any settings until you have real numbers.
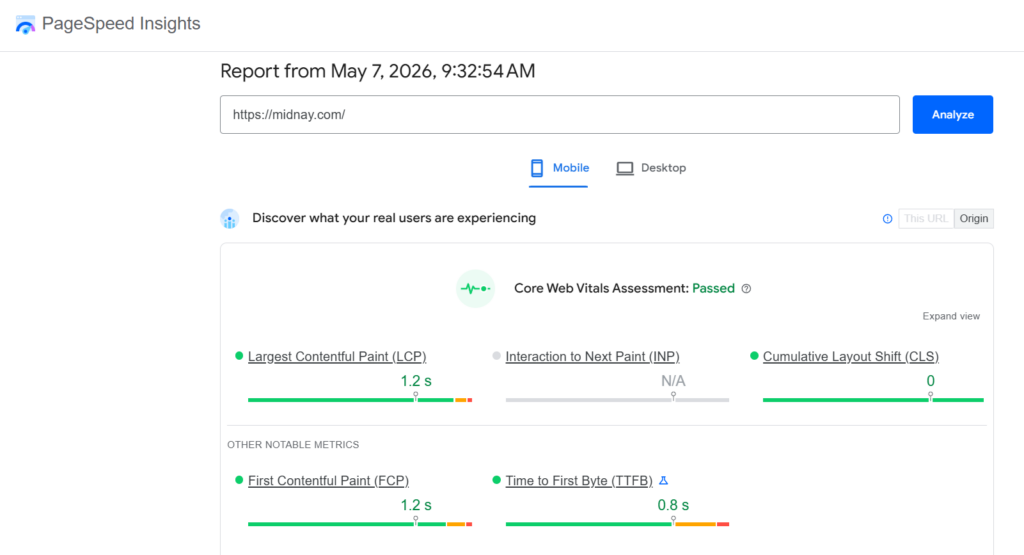
Run your site through Google PageSpeed Insights, GTmetrix, and WebPageTest, you can test it for free. Sometimes, signup may be required. Test multiple times. Clear your cache between runs. Use locations that match where your actual audience is. Always check the mobile score first since Google uses mobile-first indexing, and that is the number that affects your rankings.
| Tool | URL | Best For | One Setting to Check |
| Google PageSpeed Insights | pagespeed.web.dev | Quick performance overview | Switch to Mobile tab |
| GTmetrix | gtmetrix.com | Detailed waterfall + load breakdown | Change test location |
| WebPageTest | webpagetest.org | Advanced testing & repeat views | Use Simple Test + Repeat View |
The screenshots below highlight the site performance metrics obtained through these speed testing tools.
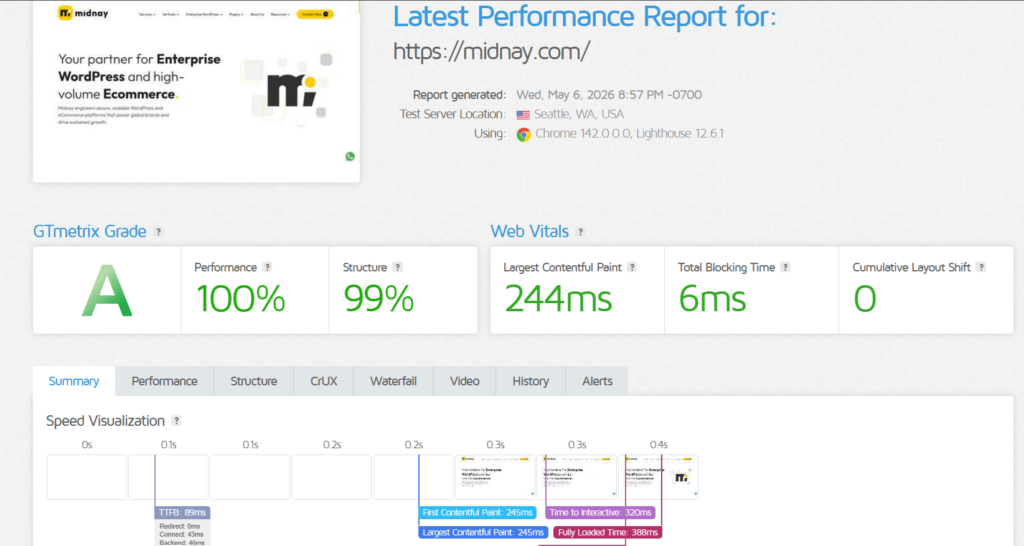
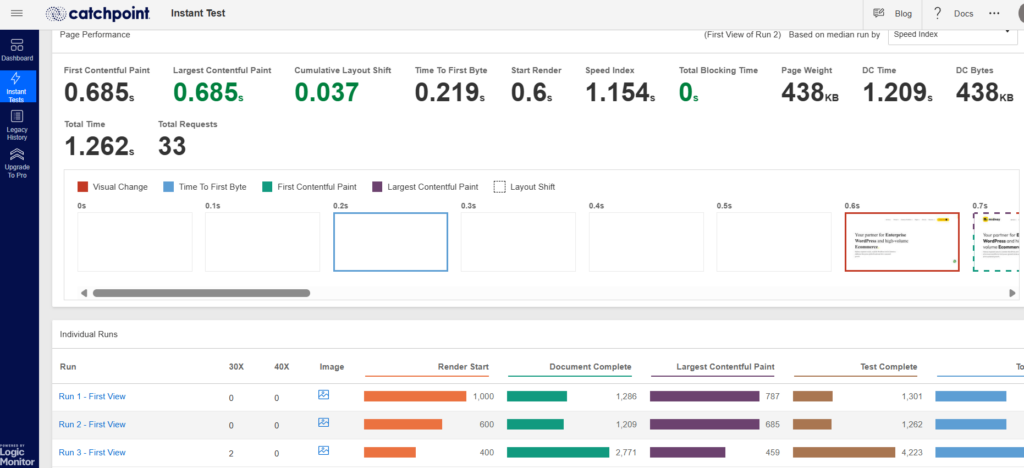
Tip: Run each test 3 times and average the results. Single runs can be misleading due to server variance.
The targets you are working toward in 2026:
- Total load time: under 3 seconds
- Time to First Byte (TTFB): under 400ms
- Largest Contentful Paint (LCP): under 2.5 seconds
- Interaction to Next Paint (INP): under 200ms
- Cumulative Layout Shift (CLS): below 0.1
TTFB deserves particular attention. It measures how long before the browser receives the first byte from your server. Everything else builds on top of it. A TTFB of 800ms means you have already spent most of your budget before the page has started rendering.
Install Query Monitor as well. It surfaces backend issues that PageSpeed cannot see: slow database queries, how many queries each plugin triggers, and which plugins are loading scripts on pages they have no business loading scripts on. Most sites we audit have never had this plugin installed. It changes what you can see.
Phase 2: Infrastructure
With your baselines in hand, the next priority is the foundation everything else runs on. No amount of caching or code cleanup can compensate for a server that is already at its ceiling.
Step 2: Fix Your Hosting Before Anything Else
Poor hosting sets a ceiling on your performance that no plugin can raise. This is the most common root cause we find on sites that have already been through a round of optimization.
Use WP Benchmark to score your host’s actual CPU, filesystem, database, and object cache performance. A score below 6 out of 10 means the server itself is the bottleneck. No caching configuration, no CDN, and no code change will get you past it.
What a properly configured host looks like in 2026
- NVMe SSD storage
- PHP 8.3 or newer
- Redis or Memcached for object caching
- TTFB consistently under 200-400 ms
- At least 256MB PHP memory
Managed WordPress hosts like SiteGround and Kinsta meet these requirements out of the box. Standard shared hosting usually does not, and resource contention from neighbouring accounts means your performance can vary unpredictably under traffic.
Check server location too. A site hosted in the US serving a primarily European audience carries a latency penalty that no caching layer fully compensates for. If there is a significant geographic mismatch between your server and your audience, that is worth addressing at the hosting level.
Phase 3: Code and Asset Cleanup
Once the infrastructure is solid, the next source of drag is almost always the code itself. plugins loading things they should not, and themes carrying far more weight than any page needs. This is where most of the recoverable speed hides.
Step 3: Audit and Clean Up Plugins
Plugins are where most of the weight hides on a typical WordPress site. When we run a plugin audit, the same problems come up almost every time: plugins doing overlapping jobs, plugins abandoned years ago and never removed, and plugins loading scripts and stylesheets on every page regardless of whether they are used there.
A contact form plugin loading JavaScript on your homepage. A slider plugin injecting CSS into your product pages. These are not unusual cases. They are what we find on the majority of sites we audit.
How to audit your plugins properly
- Open Query Monitor and check what is loading on each page type.
- Identify plugins loading assets on pages where they serve no function.
- Check for plugins that duplicate functionality already handled by another plugin.
- Remove or deactivate anything that has not been updated in over a year and is not business-critical.
- Use Asset CleanUp or Perfmatters to restrict remaining plugins to the pages they actually need to load on.
Trimming the plugin footprint alone, without changing anything else, consistently drops total page weight by 30 to 40 percent on sites that have never had a proper audit.
A note on forms and CAPTCHAs
Every form plugin brings an anti-spam solution with it. reCAPTCHA, hCaptcha, Cloudflare Turnstile. These third-party scripts add load time and external DNS lookups on every page they appear on, not just the page with the form.
The rule we apply: load form assets only on pages that contain a form. Keep the number of forms to the minimum the site needs. Evaluate whether a lighter spam solution can replace a heavy CAPTCHA. The performance case and the security case for doing this point the same way.
Step 4: Address Theme and Code Bloat
With plugins cleaned up, the next layer to address is the theme itself. Builder themes are the most underestimated performance liability on WordPress. Elementor and WPBakery-based themes are the most common offenders. They inject large amounts of CSS and JavaScript into every page, much of it unused on any given view. WPBakery in particular generates notoriously messy shortcode-dependent markup that slows rendering and makes future maintenance increasingly painful as the site grows.
When we rebuild these sites, two things are standard practice from the start.
1. Replace jQuery and GSAP above the fold with vanilla JavaScript
jQuery ships as a default dependency in many WordPress themes and plugins. GSAP is a capable animation library. Neither should be a hard requirement for anything the user sees before they scroll. Vanilla JavaScript handles the same tasks above the fold, removes the external dependency from the critical rendering path, and consistently improves LCP scores.
2. Use the picture element instead of srcset alone
The srcset attribute lets the browser choose which image size to load, but gives you limited control over what actually gets served across different screen sizes and formats. The HTML picture element lets you be explicit.
We serve a compact WebP at mobile widths and a higher-resolution version at larger breakpoints. Combined with a preload hint in the document head, the hero image gets fetched at the right size and format as early as the browser can start. LCP improvement from this change is visible immediately in WebPageTest’s waterfall.
Migrating from a heavy builder theme to a custom build with these practices in place routinely produces PageSpeed score improvements of 20 to 30 points before caching or hosting changes are even considered. That is how much these themes cost by default.
Phase 4: Performance Multipliers
With clean infrastructure and clean code in place, you are now ready to apply the layers that amplify everything underneath. Applied earlier, these tools deliver a fraction of their potential benefit.
Step 5: Set Up Caching Properly
Caching is the multiplier. It works best when the foundation underneath it is already solid. Caching on top of slow hosting or a bloated plugin footprint gives you a fraction of the benefit it should.
Use two layers, not one
Server-level caching converts dynamic WordPress pages into static HTML, eliminating PHP processing and database queries on repeat visits. LiteSpeed Cache is the strongest free option on LiteSpeed servers. WP Rocket auto-configures most settings sensibly and is worth the cost for non-technical users or busy client sites.
Edge-level caching through Cloudflare APO delivers full-page caching from servers near your users for $5 per month. This is separate from server-level caching and adds meaningful performance on top of it.
Core caching settings to enable
- Page caching with background preload
- Object caching via Redis or Memcached if host-supported
- Browser caching for static assets
- Brotli or GZIP compression (70 to 90 percent smaller text files)
- Minification of CSS, JS, and HTML
- Exclusions for /cart/, /checkout/, and account pages
Step 6: Optimize Images
Images account for 50 to 70 percent of page weight on most content sites. With your caching layer in place, image optimization is the fastest remaining area to recover significant size.
Use Modern Image Formats and Compression
WebP is the current baseline. AVIF delivers another 20 to 30 percent reduction on top of WebP and now has broad enough browser support to serve as the primary format. ShortPixel and Imagify both handle WebP and AVIF automatically. Set compression to lossy at 80 to 85 percent quality. That range delivers 40 to 70 percent file size reduction without any visible quality loss.
Improve Image Loading and Rendering
- Lazy load all images below the fold.
- Do not lazy load the hero image. Lazy loading your LCP element hurts your LCP score.
- Add fetchpriority=”high” to the LCP image element.
- Add a hint in the document head for the hero image.
- Always set explicit width and height attributes to prevent layout shifts.
- Keep hero images under 120KB after compression.
Offload static assets to BunnyCDN or Cloudflare for edge delivery. Self-host Google Fonts via OMGF to remove the external DNS lookup from the critical path.
Step 7: Improve INP and JavaScript Performance
Now that your heaviest assets are optimised, JavaScript execution is the remaining drag on interactivity. INP became a Core Web Vitals metric in 2024 and measures how quickly your page responds to user interactions throughout the session. The target is under 200ms. The main cause of failure is too much JavaScript executing on the main thread at the wrong time.
Defer and delay third-party scripts
Analytics, chat widgets, social embeds, and tag manager scripts do not need to run before the user interacts with the page. Use Perfmatters to delay these until user interaction. This removes them from the critical rendering path and is one of the most direct ways to improve INP.
Disable WordPress defaults that add no value
- Emoji script (wp-emoji-release.min.js loads on every page by default)
- oEmbed (unless you actively use WordPress embeds)
- Heartbeat API (or reduce its frequency outside of the admin)
- Unused REST API endpoints
None of these are essential for most sites. Each one removed is a request and a few milliseconds back in the budget.
Step 8: Use a CDN
With everything else in order, a CDN is the final layer that closes the gap for users far from your origin server. A CDN (Content Delivery Network) serves your static assets from servers geographically close to your visitors, reducing latency for users who are far from your origin server.
Cloudflare is the default choice for most sites. The free tier handles static asset delivery. Adding Cloudflare APO for $5 per month extends this to full-page caching for WordPress. BunnyCDN is a strong alternative for static assets at a lower cost.
Enable HTTP/3 and Brotli compression through your CDN configuration if your CDN supports it. Most do. This reduces file sizes in transit and speeds up connection setup on modern browsers.
Phase 5: Ongoing Maintenance
Speed is not a one-time achievement. Without regular upkeep, database bloat and plugin sprawl accumulate silently and erode the gains you have made.
Step 9: Keep the Database Clean
Database bloat accumulates slowly and degrades query performance over time. On a site with a few years of content and editorial history, this is worth addressing systematically.
Use a maintained cleanup plugin such as WP-Optimize, and schedule weekly cleanups. These remove post revisions, spam comments, trashed content, and orphaned transient data left behind by deleted plugins.
- Add this line to your wp-config.php to cap revision storage at the source: define(‘WP_POST_REVISIONS’, 4);
- Also check your autoloaded data size in phpMyAdmin. Run this query: SELECT SUM(LENGTH(option_value)) FROM wp_options WHERE autoload = ‘yes’;
Anything approaching or exceeding ~800KB warrants investigation. Autoloaded data is loaded into memory on every single page request. Leftover records from uninstalled plugins are a common culprit.
Step 10: Target Core Web Vitals Directly
After working through the steps above, run PageSpeed Insights again and look at the Core Web Vitals breakdown specifically. These are the metrics Google uses in ranking signals, and each one has specific causes and fixes.
Improve LCP (Largest Contentful Paint)
- Preload the hero image with
- Add fetchpriority=”high” to the LCP image element
- Use the picture element for explicit format and size control
- Eliminate render-blocking resources above the fold
Improve INP (Interaction to Next Paint)
- Delay non-essential third-party scripts until user interaction
- Remove unused JavaScript
- Reduce main-thread work by deferring analytics and tag manager
Reduce CLS (Cumulative Layout Shift)
- Set explicit width and height on all images and embeds
- Use font-display: swap or font-display: optional to prevent invisible text
- Avoid inserting content above existing content after load
The Right Order Is the Point
Speed optimization done out of sequence wastes time. Caching on top of a slow server does not make the server faster. Minifying CSS on a site whose real problem is sixty plugins loading assets everywhere does not move the needle.
The phases in this guide are sequenced for a reason. Measure first. Fix the infrastructure. Clean up the code and asset footprint. Then apply the performance multipliers on top of a foundation that can support them. Maintain from there.
A quick reference checklist:
- Measure baselines: mobile TTFB, LCP, INP, CLS
- Benchmark host. Upgrade if TTFB exceeds 600ms.
- Audit plugins with Query Monitor. Remove or restrict asset loading.
- Evaluate and replace bloated builder themes where needed.
- Configure server-level caching and Cloudflare APO.
- Compress images to WebP/AVIF. Preload LCP image with fetchpriority high.
- Defer third-party JS. Disable WordPress bloat via Perfmatters.
- Clean database. Set WP_POST_REVISIONS to 4.
- Retest Core Web Vitals and close remaining gaps.
- Monitor on an ongoing basis. Not just at launch.
Work through this list in order and most WordPress sites can get from a typical 6 to 8 second load to under 3 seconds. The fixes are not complicated. The discipline is knowing which phase to run first. Need help implementing all of this? Our WordPress Speed Optimization Services are designed to identify performance and fix them with proven optimization strategies.
Leave a Reply
Articles
Related Insights.
Blogs and Resources on WordPress, WooCommerce, SEO and Marketing

Leave a
Comment.